How to Disable USB Mass Storage Devices


How to Disable or Enable access to USB Storage Devices

A common security anxiety at organizations allows users to connect a USB flash drive, because it can so easily copy the data. You can completely disable USB devices on writing, using a simple trick to disable USB devices. You must ensure that users are not administrators on the computer, for the reason that they can easily modify this setting back.

Follow the steps given below to disable the access to USB devices
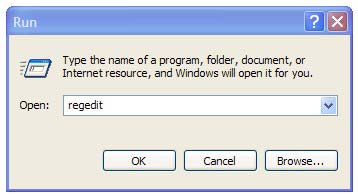
First Click Start Button >  Click Run.
In the Run box, type regedit and then click OK.
Then locate the following key in the registry
HKEY_LOCAL_MACHINE\SYSTEM\CurrentControlSet\Services\USBSTOR


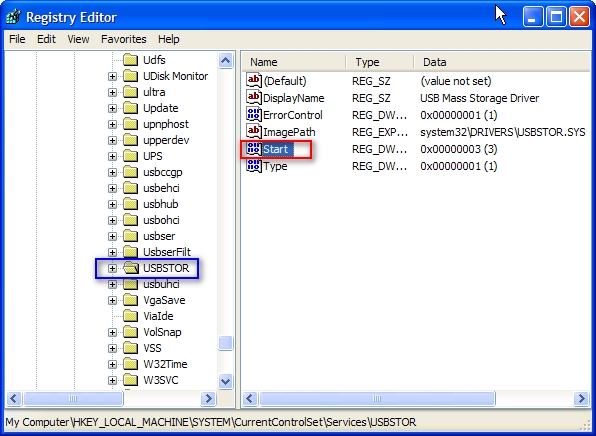
In the right side panel, double click on the value start then set it a Hexadecimal value data 4.
And then click OK. (The default value is 3)


If you want to re-enable the USB ports set it a Hexadecimal value data 3.
Close the registry editor.
You'll need to reboot your computer before the changes take effect.
This trick will works on Windows Vista as well.

That's all.


CAUTION! : It is recommends that before you attempt to use the registry editor, make sure that you back up the whole registry or export the registry keys in the registry that you plan to edit. Incorrectly editing the registry may damage your system. Use Registry Editor at your own risk, we cannot guarantee that you can solve problems that result from using Registry Editor incorrectly.


Category: Registry Tweaks
Operating System : Windows

How to Disable Windows Security Center Balloon Warning


How to Disable Windows Security Center Balloon Warning

First Go to Start à Click Run à type  wscui.cpl


OR
Click Start Button > Click Settings > Control Panel > and then clicking Security Center >
In the left side pane, click Change the way Security Center alerts me.


An alert settings window appear in the screen
Click the alert settings option you want


Then uncheck all the checkbox Alerts:
1. Firewall
2. Automatic Updates
3. Virus Protection
Click “OK” button.


Another Method:
First Go to Start > Click Run > and type services.msc  hit Enter button.


OR
Click Start Button > Click Settings > Control Panel > and Select “Administrator Tools” > Select “Services” > then Double click “Services”.


Scroll down to “Security Center” and double click it
In the “General” tab, select the Startup type change the setting from Automatic to Disabled


This will permanently disable “Security Center” forever, even after you restart the computer.
then look for “service status” at the bottom of dialog window and click stop button to immediately during current log on session.


Before


After

That's all.

CAUTION! : These tips and tricks are advanced, we can not guarantee that you will be able to solve your problem that result from using tips and tricks incorrectly and is used at your own risk.
Category: Tips & Tricks
Operating System : Windows

Watch ASCII Star Wars Movie in Windows XP


Watch ASCII Star Wars Movie in Windows XP
                                                                                        
Do you know that there is Windows XP with a hidden "Star Wars movie" inside it!  This is a cool hidden movie on Windows XP, if you would like to find this hidden movie.

First Go to Start à Click Run


Then Type:  
telnet towel.blinkenlights.nl (or) telnet://towel.blinkenlights.nl
Click “OK” button or Hit Enter Key
After a few seconds, it should play automatically


Don’t forget, you should always connect to the Internet after try this trick.
Enjoy this cool movie.....


Category: Easter Eggs
Requirements : Internet Connection

How to Create Auto Run / Auto Play CD/DVD

How to Create Auto Run / Auto Play CD/DVD :

The application CD’s or games cd’s that you purchase and insert into your cd/dvd drive they will run/play automatically, and your burned CD’s can not do the same….. why?


You can bring into run a setup program, or there is an HTML page that links to the CD contents. You can simply open the Notepad to create a three line text file based on the lines below, and name it Autorun.inf.  

I will explain to you how to easily create Autorun CD

First you can create your own autorun.inf file
Open Notpad then type the following three lines are an example of a simple Autorun.inf file.

[autorun]
open=setup.exe
icon=myicon.ico


Once the above three lines have been typed in, save file as Autorun.inf

Set on all files in the CD's root directory
If you would like to change the default windows cd icon to your own icon place the icon in to CD's root directory. 


 Default windows icon


Your own icon


Do not use any spaces between the file names that you're linking to, all the time replace the spaces with underscores “ _

Example:    my_setup.exe
                  my_icon.ico


  • You can run pdf, doc, html files to run/play automatically using the 'shellexecute' command
For an example
i) Run HTML file automatically

[autorun]
shellexecute=index.html
icon=myicon.ico


Replace index.html to your own html file name  ex: yourindex.html
and change myicon.ico to your icon file name ex: youriconname.ico

ii) Run PDF file automatically

[autorun]
shellexecute=mybook.pdf
icon=myicon.ico


Replace mybook.pdf to your pdf file name ex: yourbookname.pdf
and change myicon.ico to your icon file name ex: youriconname.ico


iii) Run DOC file automatically

[autorun]
shellexecute=mydocument.doc
icon=myicon.ico


Replace mydocument.doc to your doc file name ex: yourdocument.doc
and change myicon.ico to your icon file name ex: youriconname.ico


Do not use any spaces between the file names, always replace the spaces with underscores “ _  “


And you can create any file like mp3, jpeg, mpeg, wmv and other files run automaticaly follow the same steps given above. Don’t forget the file name and extension must match exactly for shellexecute to work properly.

That's all.

CAUTION! : These tips and tricks are advanced, we can not guarantee that you will be able to solve your problem that result from using tips and tricks incorrectly and is used at your own risk.
Category: Tips & Tricks
Operating System : Windows

Call your friends from their own Mobile Number

  • Call your friends from their own mobile number
You can call for your friends from their own Phone/Mobile number. This means that your friend will get a call from his own Phone/Mobile number, is it really and how ?
Follow these simple steps below!

Step 1:
Now you can go to First http://www.mobivox.com and register for a free account.


Step 2 :
During the Registration period, keep in mind given the victim phone number in the field "Phone Number", as shown below.


Step 3
Complete the registration process, first confirm email before your MOBIVOX account can be activated, go to your email account open the email and click on the validation link to activate your MOBIVOX account. And  then log into your account.  


Step 4 :
After logging in your account you can Click on "Direct WebCall" button. You will reach your destination at page shown below. In the "Enter Number" box, select the country and cell phone number. Time to click "Call Now" button to call your friends with its own number.


Step 5 :
Now, your friend will get a call from his own number... he was "very shocked" to see his own number calling him…….. Enjoy

If you have any problem occurred try “Call Now” again!


I hope you enjoy this trick......

Category: Miscellaneous
Requirements : e-mail account

Recommended Articles

100 GB Free Backup

 
Contact Form